|
Enrolment
|
 
|
|
Enrolment
|
|
Enrolment All master
template documents work in a similar way. Select WORD (or
double-click highlighted document) to amend. Document
Header: Master Name Official
Document Send To School A, B, C Notes Template example (showing merge
fields) 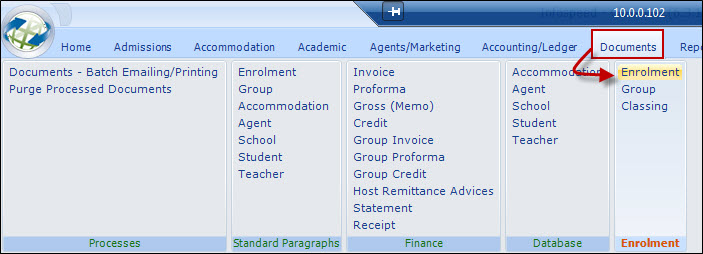
Each master document consists of a
Word document with a Header that identifies and controls its use in the
system.
As "Enrolment Documents" are the most commonly used, these are
explained in detail here.
All other documents work in the same way, just the
fields available may be different!
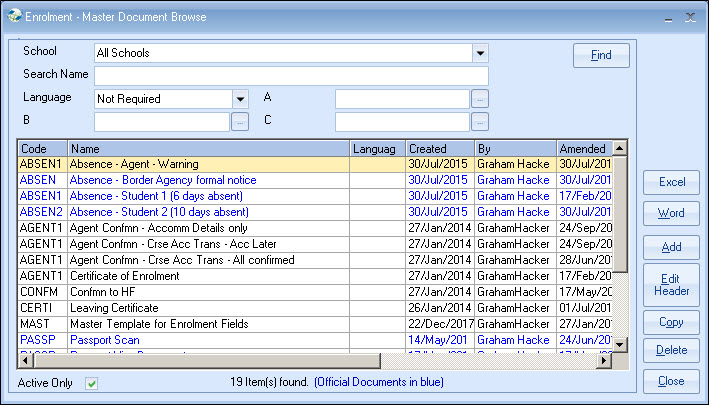
Select ADD to create a new
document
Select EDIT HEADER to amend header details
Select COPY to
copy an existing student
Select DELETE to remove master document (this will
not remove existing saved documents).
ADD - create a new
document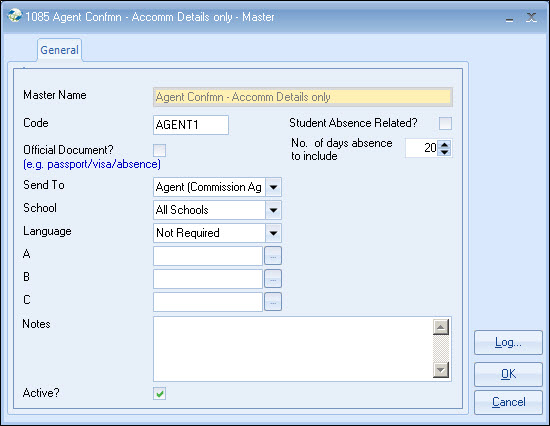
Enter
the document name (maximum 30 characters).
As these are listed in alpha
order, it may be useful to start with the type of document, eg.
Agent..., Student..., Accommodation...
Code
Accept
the default entered by the system, or overtype with own code (not
important)
Set this if the document is to be used in an official
capacity, eg. for storing copies of students' passports or visa
documents
Select
Student, Agent, Accommodation or School.
If a document may be sent to more
than 1 receiver, eg. student or agent, then 2 master documents are required.
This is important if the document is to be emailed, as this determines the
default email address to be used.
Select a
school if the document does not apply to all schools; otherwise select "All
Schools".
A single document designed for use by all schools is generally
advised, and reduces the number of documents required.
Language
Leave as "default language", unless the
same document is to be created in more than 1 language.
Select a specific
language if multiple languages apply. It is suggested that unless you intend to
make full use of language documents, then the occasional foreign language letter
is best left as "default language".
These are
spare selection fields, not generally used.
The headings may be changed in
Settings.
Enter any
notes associated with this document.
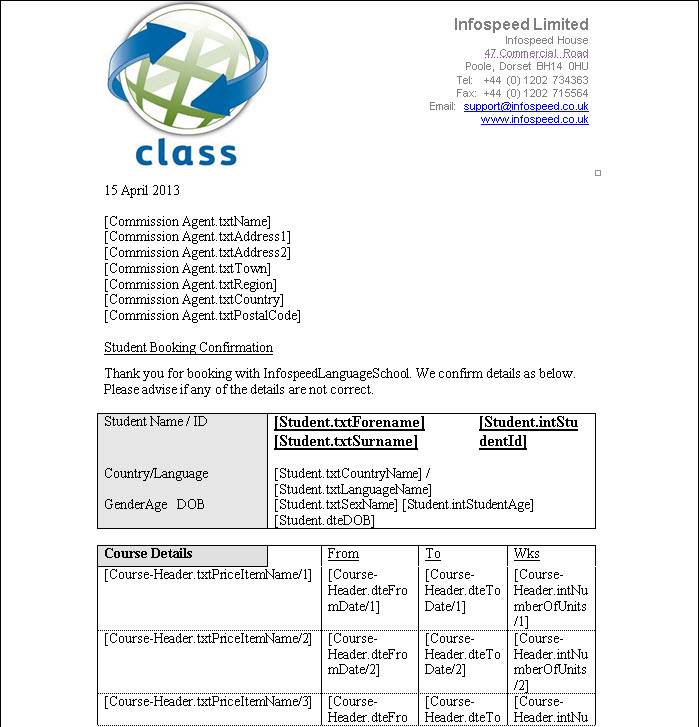
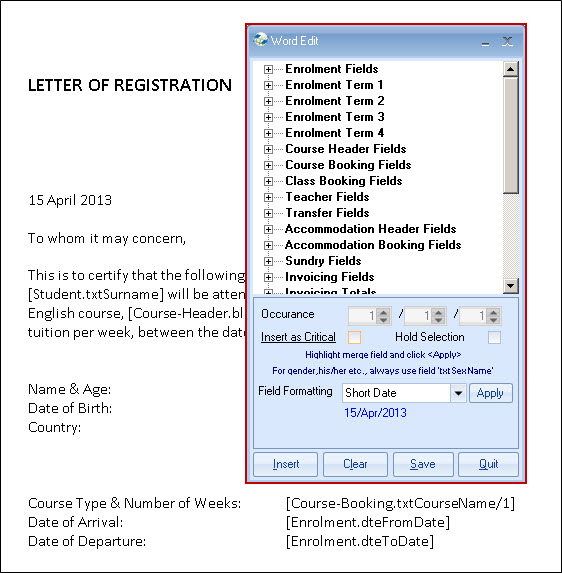
Merged
Example
Creating a new document is easiest shown by example, and the
layout below has been chosen to demonstrate various aspects of a Word Master
document. 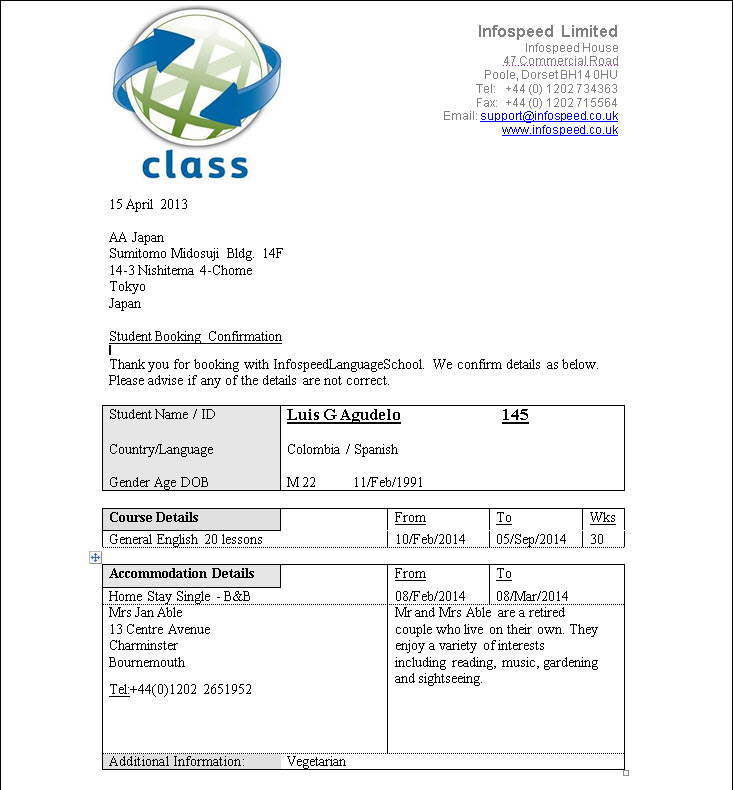
General
The merge field
name may be longer than the field being merged, (eg.
[Course-Header.dteFromDate/1} is a date field) and "wrapping" may occur in the
master document. Word will sort this out when merged!
Use of
Tables
Tables are very useful to ensure fields are neatly lined
up.
Word allows the table to be hidden if not required when document is
displayed or printed (Word > Format > borders and
shading).
Alternatively, use tabs rather than the space bar to line up
fields.
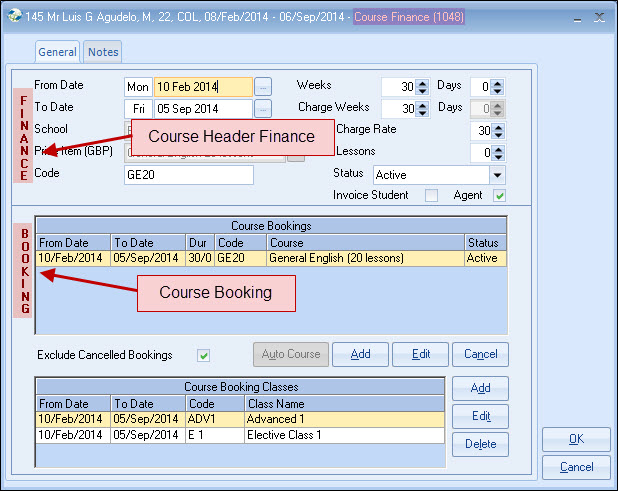
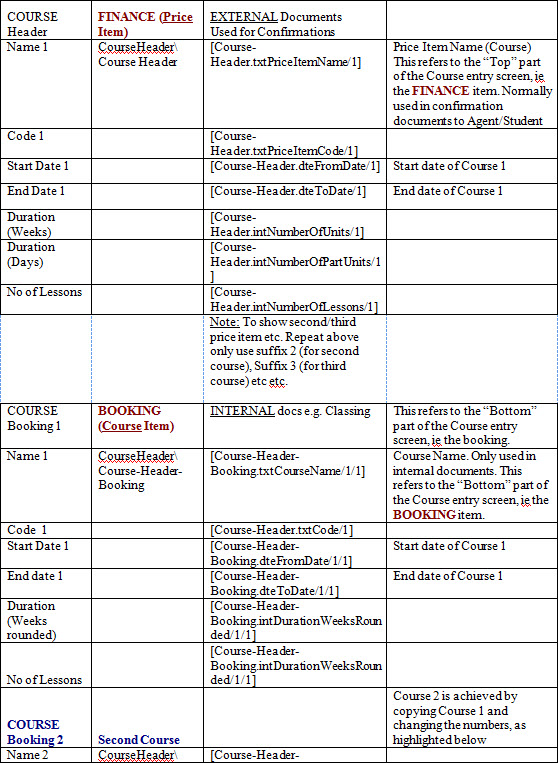
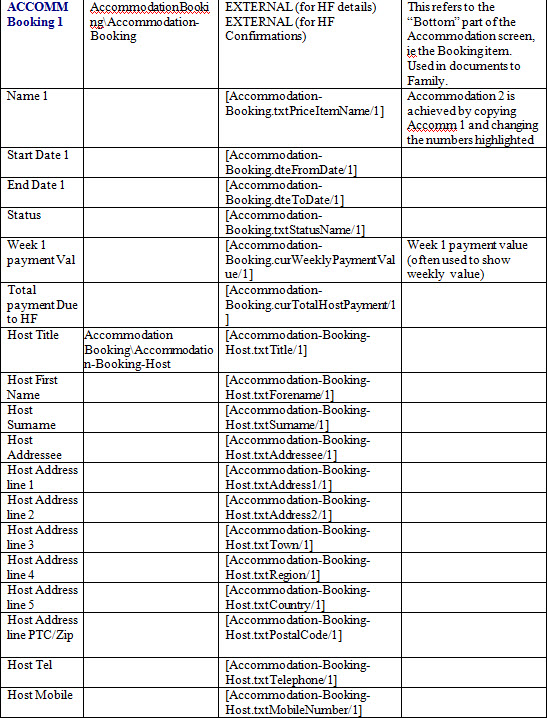
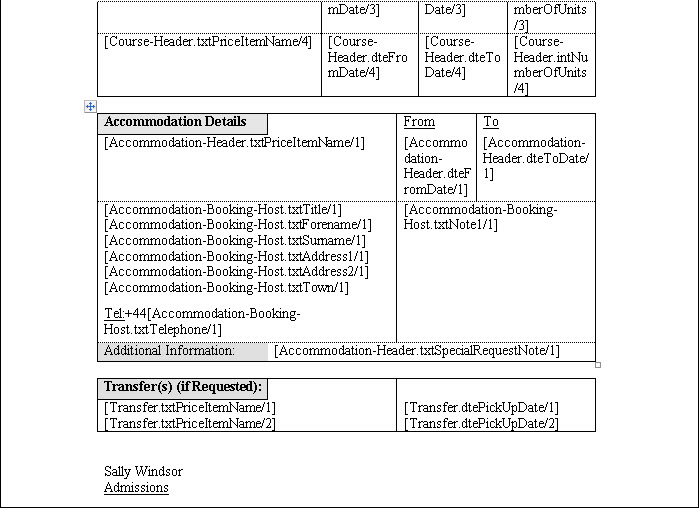
Tables are also useful if multiple
entries of the same item are to be allowed.
For example, if an enrolment
could consist of 1,2 or 3 courses, then a table provides the ability to allow a
single document to be used to display 1,2 or 3 courses.
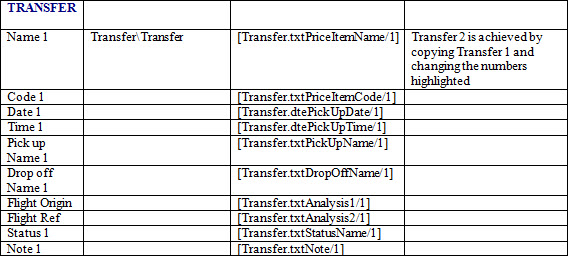
In the above example,
the course has been entered 4 times. The first entry line has all items
suffixed /1 and the second entry line /2, meaning the first and second
occurrence. If only one entry exists, the second line is suppressed.
Where
fields contain more than one suffix eg. 1/1/1 or 1/1, although there is logic
and meaning to the suffixes, in order to use "occurrence 1" and "occurrence 2"
etc. change the last digit first and work inwards until you get
correct results:
1/1/1
1/1/2
Then try:
1/1/1
1/2/1 etc.
Trial and error eventually give correct results.
Class will not recognise "hand drawn" tables, so always use the table "Insert" option. Hand drawn (or erased) lines may be used once the table is established.
Merge Fields in text
Merge
fields within text should be minimised if untidy wrapping is to be avoided.
For example, including a student's name in a text line might result in the
first name and the surname appearing on 2 separate lines!
Today's
Date
A date needing updating each time the document is merged requires
the use of the "Insert - Date and Time" function within Word, eg.
letter/document date.

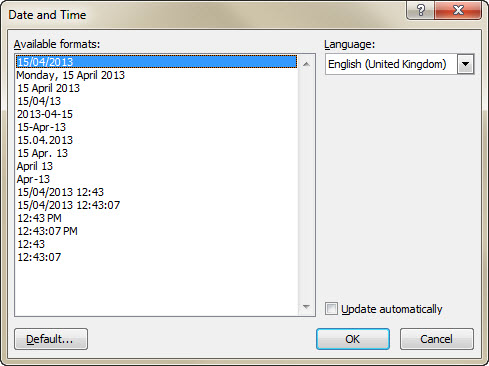
Tick the "Update automatically" box if the date is to be updated each day.
Merge
Fields
To find the field required, click on the category most likely to
contain that field.
Trial and error will soon provide the answer required.
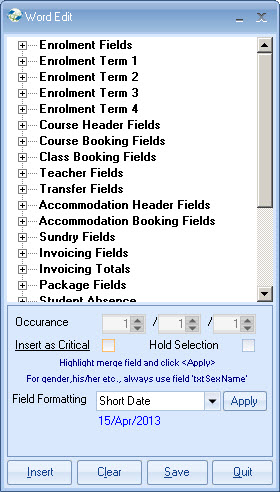
Categories marked
with a "+" can be expanded by clicking
on them.
Fully expanded categories are marked with a "-" and
are contracted by clicking on them again.
Several fields selected from the
same category can be placed on a document by selecting 'Insert' or by
double-clicking each field separately.
Insert as
Critical
Critical
fields are used to warn when important data is missing, eg. host name, in a
letter confirming accommodation booking.
After selecting the field, tick the critical check box
before inserting. This will show the field in red
on the document.
A document with a critical field
being merged will produce a warning if that field is not present, although the
merge will still continue.
(On a document batch run, the document will
not merge and an error report will show the error).
Formatting Dates/Numbers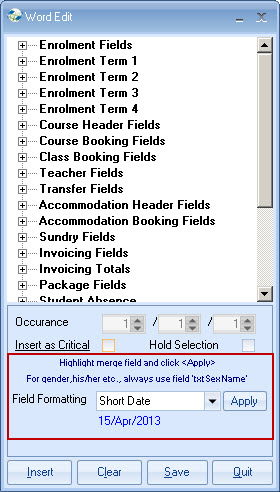
A predefined list
of formats has been provided for dates and numerical values.
This allows
documents to be shown with dates in a range of formats, eg. a certificate could
show dates as 29 October 2012 rather than say 29/Oct/12.
To apply "field formatting", highlight
the merge field in the document (see above), select the format required and
"apply".
Before
applying format: [Enrolment.dteFrom Date]
After
applying format: <[Enrolment.dteFromDate]dd-MMMM-yyyy]>
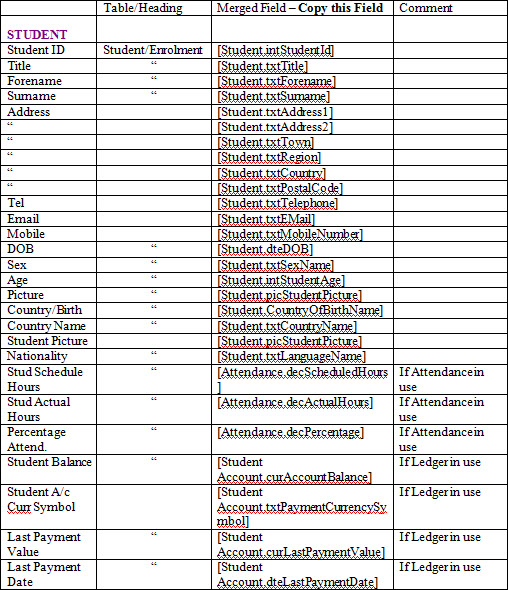
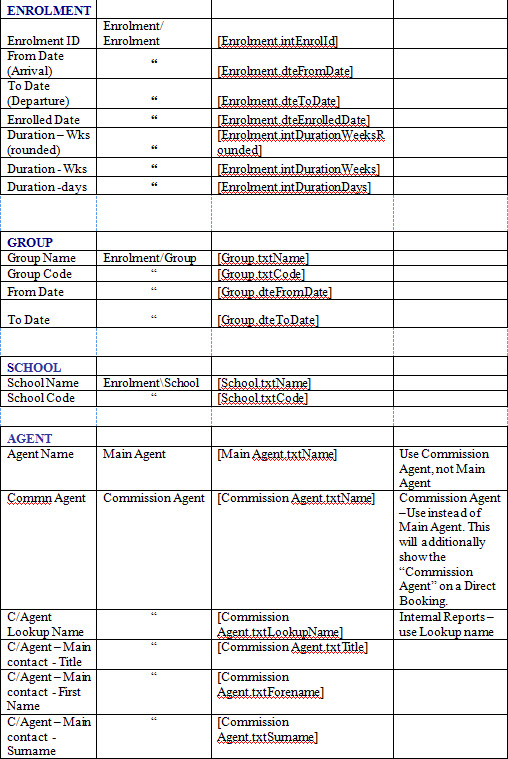
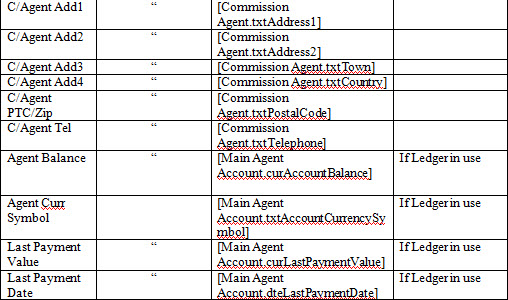
Fields - available for
enrolment documents
For a new user to this process, the list of fields
may be a little daunting, so it may be quicker to use the shortened list
below.
However, the list below only contains a small fraction of the fields
available, so if your requirement is not there, then you will need to use the
list provided in the "Word Edit" list.
Saving the
document
It is best to use the Save button on the Word Edit box (see
above).
This will save and close down automatically. Using the Word save
options is valid, but always save using the default file name and location
provided.
Merge Fields